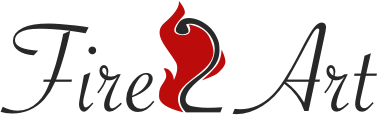
Wood burning is a craft that has become really popular in the last decade, even though it has been around for centuries. Basically, we want to apply heat to a wooden base in order to create a design. With the right wood burning tool, it’s possible to create original pieces and intricate designs on a piece of wood.
The good news? It’s very easy to get started!
Below, we are going to go over all the tools you need to begin experimenting with wood burning and creating your first pieces, as well as some more advanced tools that will help you create unique and beautiful wood burning art.
We will start with the basic tools you need to start, most importantly the pyrography pen, without which wood burning is not possible. Afterward, we will present the different exchangeable tips you can use to create unique patterns or work on your calligraphy. There are many and each has its own function.
Finally, we will discuss the use of stencils and all the necessary safety measures that will help you become an expert in wood-burning dealing with the risks that come with it in a safe manner.
What tools do you need to get started with wood burning?
- Pyrography pen
- Pyrography pen tips
- Wood burning stencils
- Wood as support
- Safety tools
Luckily, very few tools are necessary to get started on wood burning. While you can get them separately, there are many kits that are ideal for beginners since they include all the basic tools you will need. Kits for more advanced artists are also available and could be a good idea for those trying to save some money on quality wood burning tools or get a bit of variety in terms of tips for the wood burning pen.
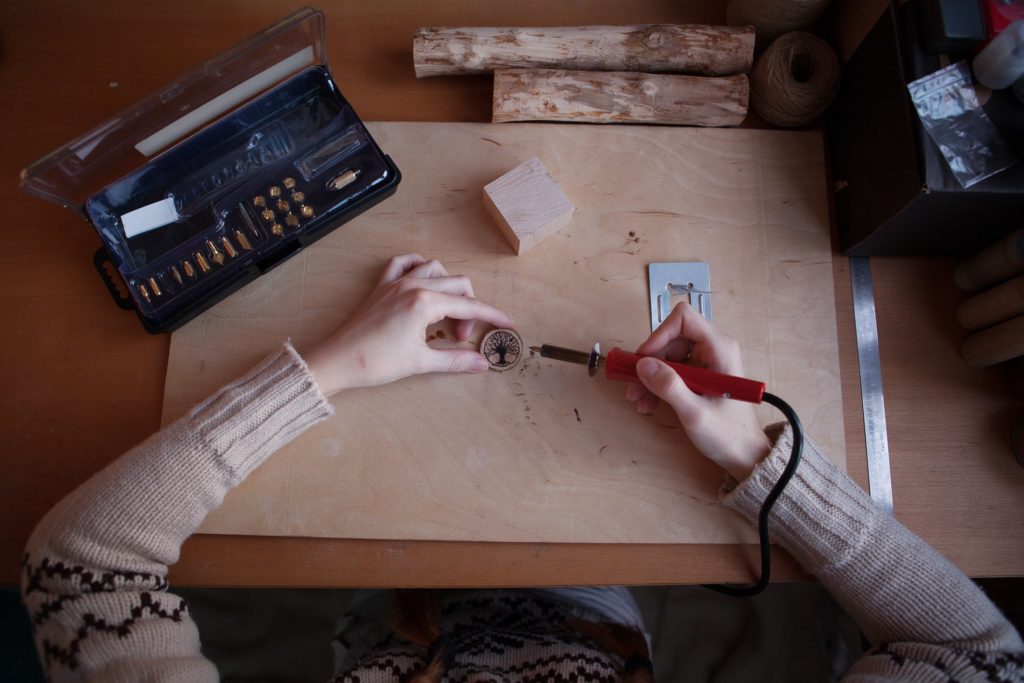
First of all, we have to mention the pyrography pen, a very simple device that looks like a pen but has a metal end through which the heat gets to the tip, therefore making it possible to burn the wood. This is the most important wood burning tool you will need.
There are also a wide variety of tips that are exchangeable and adapted to your wood burning pen. Each of them allows the user to create different patterns on the wood. Some may allow you to create thin stylized lines, others may be useful to create wider traces or even shading.
A pen and some basic tips are enough to get started. Once you have experimented with this craft and feel more confident and ready to do more complicated work, you can invest in different tips, many of which come with very specific designs.
If you’re thinking all of this is out of your budget, don’t worry! It’s easy to find pens for less than 20 dollars and there are numerous kits including all sorts of tips.
Other tools you will need for wood burning
Once you got your pen and some tips to get started, it’s time to think about the wood you’re going to use and the stencils you will need.
Even though all types of wood are theoretically ideal supports for wood burning, there are some things to keep in mind: some are better or easier to work with, others should be avoided.
First of all, you need to consider the color of the wood. A dark wood may not show your design well, while a lighter colored wood has the potential of enhancing your work. In the same way, some types of wood are easier to burn than others, which may end up affecting the final result you’re going for.
When talking about stencils, though without a doubt they are useful, it’s more a personal decision. Some people find it easier to create or copy a design and then transfer it into the wood to be after burnt with the pen creating your wood burning piece of art.
More creative people or those with great drawing skills may find it easier to draw directly on the wood. That’s also an option!
And last but not least, we cannot fail to mention diverse tools and safety measures you will need to work on wood burning in a safe way. After all, you want to burn the wood, not your hands!

Pyrography Pen: most important wood burning tool
A wood burning pen is a very simple tool that while it functions as a pen, also gets extremely hot, which in time burns the wood allowing you to create patterns and designs.
The heat that this pen crate is transferred to a metal tip. Be careful! The tip of the pen will be very hot. As always when working with heat or fire, you need to take the necessary precautions to avoid getting hurt. For example, whenever the tips need to be changed, you should let the pen cool down for about 5 minutes.
This pen is also known as pyrography pen, woodburner, or heat pen. It will be your most important tool while doing wood burning, so it’s important that you get familiar with it by practicing on wood scraps. Getting some practice before starting on your first real piece is really important. You need to be familiar with the tips and what can be achieved with each of them, as well as how much pressure and time you need to create the desired effect.
Different types of wood burning pens
There is a wide variety of pens in the market, as well as kits that include a pen, a metal holder (very important when thinking about safety), and several tips that will let you do the basic lines, either thick or thin, as well as shading or different shapes.
While practicing with your pen you will notice that you have to regulate the speed at which you are working. Going too fast will not give the heat pen enough time to burn the wood, while going too slow may create darker lines and maybe even a bit of smoke. Slow and steady wins the race, they say.
Prices of pyrography pens vary enormously and we would recommend you start with a simple, not very expensive kit that will give you the opportunity to discover the craft and see if you enjoy it.
Pyrography pen tips
There is a wide variety of wood burning pen tips that will help you create the effects you’re looking for when working the wood to create a piece of art.
The tips are exchangeable and you just have to keep in mind that they are hot, so when changing them it’s recommended to wait a few minutes to allow the pen to cool down and avoid getting burnt.
The universal tips are the most used to create lines. They come in different thicknesses and have an angle that allows you to play around with your design and make it more unique.
Shading tips are also very popular since they do exactly what their name suggests: shades. With these tips it’s all about the pressure you use, the more pressure the darker the shading will be. Some people also use these tips to create teardrop effects.
Another useful tip is the dot tip. As you can probably imagine, this tip creates circular forms. And it also comes in different thicknesses to allow different diameters.
A calligraphy tip works pretty much like a calligraphy pen which has an angle. This lets you create beautiful writings with a personalized style. If you are good with calligraphy with a normal pen, using this tip in your pyrography pen will be quite easy!
Another tip called groove tip is very useful to create patterns and stylized lines.
For more advanced artists already familiar with the world of wood burning, there are branding tips that can create specific patterns on the wood. Some may be stars, others diamonds or hearts. These tips are very diverse and not necessary for beginners in pyrography. You can choose the ones that you will need in your advanced projects.
Wood burning stencils
When talking about wood burning tools we cannot ignore the extended use of stencils.
For many wood burning artists, especially those giving their first steps in this craft, using stencils is an easy solution to create beautiful designs. They can be done by hand on a piece of paper and then transferred into the wood. Or they can be downloaded and printed from any website.
If you’re not a gifted drawer, stencils are a great solution.
On the other hand, using stencils is not compulsory. Alternatively, you can also choose to go directly into the wood and draw what you have in mind. In this case, you have to be careful to draw exactly the lines and patterns you are going to later pass over with the pen. If not, you risk staining the wood and ruining your design.
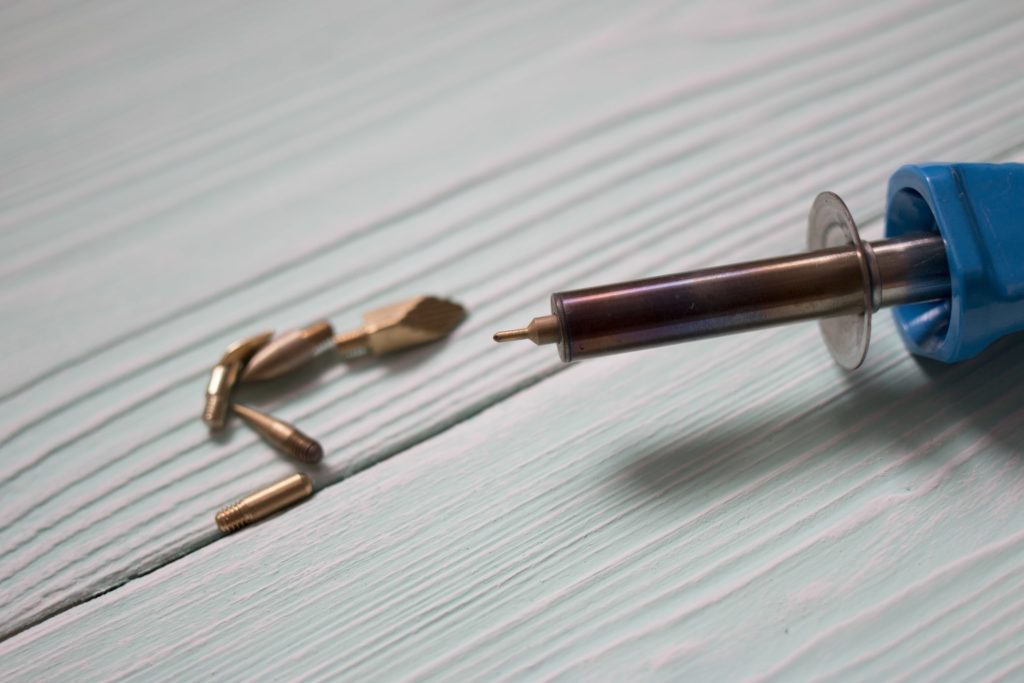
Wood to use as support
We have already mentioned that many different types of wood can be used for wood burning. However, some may help you obtain better results.
We are thinking especially of hardwoods, for example, oak, birch, maple, and wood from most fruit trees. They are of a lighter color, which is something to keep in mind in the art of wood burning. But, they are easy to handle as they take longer to burn. This gives you time to work out your speed and pressure.
When choosing your wooden support, think also about the properties of the wood you’re using. Some types of wood retain more moisture. This means that while using your wood burning tool you will end up creating smoke.
It is also possible to use softwoods for wood burning art. They are a bit more difficult to handle. Since they burn faster, you will have less of a margin for error. Fir, pine, and cedar are popular options if you rather try softwoods.
While you will be ok working with most types of wood, there are some you should avoid since they are not ideal for wood burning. Among them, we should mention driftwood, hardboard, and varnish wood. They may even be dangerous if you try to do wood burning on them.
Safety tools
Using a pyrography tool, like a wood burning pen, means that you will be dealing with a device that gets very hot (as hot as necessary to burn wood). That’s why you should take some safety measures while working.
But among the few risks of doing pyrography, there is not only the risk of getting burnt, but also inhaling the dust created by sanding the wood, and thee smoke produced by the heat pen while working on the piece of wood.
So, how can we do wood burning in a safe manner?
When appropriate measures are taken, you can enjoy wood burning safely.
In order to avoid inhaling dust or toxic particles coming for the wood burning, we recommend the use of a mask. Working in a room with open windows to improve ventilation, or even outside, may also be a good idea to avoid dust, fumes, and smoke getting into your lungs.
Choosing the right wood and having the proper wood burning tool will also help reduce risks while doing pyrography. Make sure to always avoid wood like plywood since it has been treated with toxic materials that are released with the heat. The same goes for your pyrography pen.
Wood burning pens create heat through electricity and send it to the tip. Using a solid point burner allows you to regulate the temperature of your pen. This may not also be a solution to the risk of getting burnt, but it may help with your designs too.
Common sense is another useful tool when working with heat and wood. If you notice any health effects while working or right after, you will have to consider quitting wood burning. Pay attention to rashes, coughing, and respiratory difficulty while working, if you have any of these symptoms, it’s better you stop doing wood burning.


